Level One Projects Page
Here is where you will find all the information you will need for each unit.
If you have any questions email me, or post a question to the student forum on the FAQ page
If you have any questions email me, or post a question to the student forum on the FAQ page

Website
|
Objective
A portfolio website provides a platform to write, display, and present your work in a thoughtful and engaging way. You will use your website as part of your exit interview at the end of the year and website construction and maintenance will represent 20% of your final grade.
Process
|


History of Photography
| |||

| photography_history_questions.doc |
objective
Your objective is to understand the origins , evolution, and key figures of photography. You will be looking at photography as a medium (and art term for material or process used by an artist) and present this information on your website with supporting research, videos, photos.
How you present the material is up to you. Make it visually appealing and hook the reader with interesting facts and narrative. Try not to think about this as an assignment, and more of a place to share information with people visiting your website.
How you present the material is up to you. Make it visually appealing and hook the reader with interesting facts and narrative. Try not to think about this as an assignment, and more of a place to share information with people visiting your website.
process
- Take notes on the documentary "The Genius of Photography"
Note: female nude photographs 15:50-16:20 mins in, as well as early crime scene photos 48:10-50:00 mins. Please skip ahead to avoid seeing this content.
- Answer the history of photography questions (handout) - you will use this to help you write your visual essay (not due until the end of the project).
- Research and compile information from your notes/worksheet to write a 250 word history of photography essay. Your visual history of photography essay should include:
- A time line of photography - the subject of the timeline is up to you (ex. camera types, key figures, development types, famous photos etc). Click here to access different online timeline tools.
- Include the different types of photography, various cameras and how they work, development types, etc.
- Discuss the impact photography has had since its invention
- Along with your essay post images and informational videos/links to your "Research" page
- Create a properly cited bibliography that includes all of your sources and websites used.
http://www.easybib.com/reference/guide/mla/website

intro to digital photography
| |||
| Camera Crash Course |


objective
To learn the technical aspects of using digital SLR cameras as tool and a medium to create artistic imagery. By understanding the functions of our camera we can be more informed about how to setup our shots faster, more creatively, and beautifully exposed with less need for editing.
Learning goals for this unit include an introduction of skills and knowledge in the following areas:
Learning goals for this unit include an introduction of skills and knowledge in the following areas:
- Learning how digital cameras function - i.e. digital sensors, digital files (JPG, TIFF, PSD), images specs etc.
- Understanding manual and semi-manual shooting modes (Program, Aperture Priority, Shutter Priority, Manual)
- Understand the secondary functions that can alter your photos outcomes (white balance, ISO, AF, etc.)
- Understand how to navigate the Canon camera's digital menu (monochrome, formatting cards, menu display)
- Defining and mastering composition, lighting, exposure, focal length, rule of thirds, etc.
- Understanding and manipulating natural light, studio lighting, indoor lighting, flash for perfect photos
process
To understand all the intricate details of learning digital photography we will be doing a combination of inquiry-based activities, group work, practical application, and project based work.
Please follow these steps:
Day two of this unit we will edit and post your photos in a SLIDESHOW to your ASSIGNMENTS page.
Please follow these steps:
- Watch the Youtube videos to the left. They will give you an introduction to where things are located on the camera
- Click here to go to the Camera Settings page and read the descriptions of all the camera modes
- On the same page click on the simulator buttons - it will take you to a website to see how the settings work
- I will review camera procedures and send you out to take photos with the handout on your desk
- Return the camera and upload the photos to your UBS and return your SD Card
Day two of this unit we will edit and post your photos in a SLIDESHOW to your ASSIGNMENTS page.
Camera Cheat Sheet
[Due October 19/20th]
This assignment is designed to help you better understand the functions of your camera and how to take more professional looking photographs.
Objective: put together a guide that will help you take better photos when you’re out in the field – something to help you remember how to use your camera in the moment
Objective: put together a guide that will help you take better photos when you’re out in the field – something to help you remember how to use your camera in the moment
- Here is a GENERAL guideline - only you can judge what information is going to be important to include as a guide when you're in the field and are still getting used to all the camera functions
- Should include one page of pictorial based information on how to use your camera
- 2-5 pages of information organized for someone to use easily in the field
- It should be typed and well organized
- Make sure your package is informative and easy to understand
- Create something you are proud of and would like to have had if you were doing the camera crash course again
- Use your personal knowledge, the packages supplied, and internet research to guide your cheat sheet information
Possible Headings for your cheat sheet
- Aperture and Shutter Priority - How do they work and what do they control?
- What makes up good composition? How does the rule of third work?
- ISO, White Balance, Exposure Compensation - what do they control and when should I change my settings?
- Where are the functions located on my camera?
- What is Depth of Field and how does it relate to Aperture size?
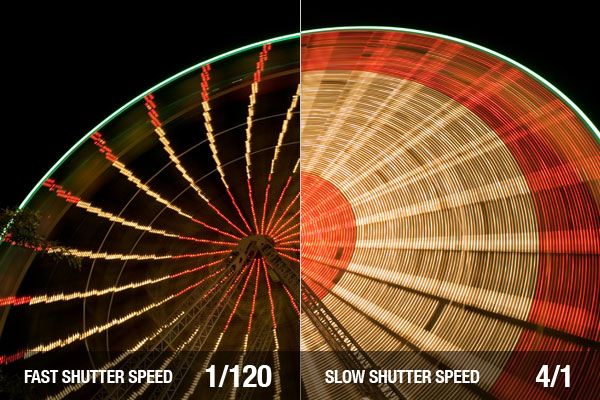
- What is Shutter Speed and when should you use this function?
- How do you compose a good photograph?

80 photos
|
objective
process
We will make a contact sheet and print an 8X10 of your 80 photos. tips and tricks
|

Creating a contact sheet in iPhoto: 80 Photos


photoshop intro
| |||||||

| photoshop_intro_project.doc |
| seaquam_1st_floor_.jpeg |
| seaquam_2nd_floor.jpeg |
objective
Photoshop is an powerful
program that enables users to manipulate photos in innumerable ways. With this ability also comes a complexity - and it can be hard
to know where to start. Luckily, there are valuable resources to help us learn very quickly how to achieve darkroom results in a digital formate in a few clicks. You will be watching 12 Photoshop editing videos as well as complete the Photoshop Intro Assignment for this unit.
process
To start our introduction to PS we will look at the basic photo editing functions. These are techniques that have been adapted from darkroom photography. Step one is to choose a photo that you have taken during this course - possibly from a weekly photo challenge. The photo should be one that you think could use some slight ‘adjusting’ to the brightness, contrast, and/or colours. You will then adjust the photo 15 different times. Once you have edited your photo the 15 different ways assigned post them to your website on your portfolio page in a slideshow with thumbnails. Make sure to put in a title and upload your images in order.
tips and tricks
- save your photos as JPEG'S that are under 5MB otherwise they will not upload to weebly.
- make sure you open your original photo every single time otherwise you will double edit your photos

picasso's revenge
| |||||


| picassos_revenge.ppt |
| Picasso's Revenge Instructions |
objective
Cubism (kyoobiz'm), n. A movement that stresses abstract form at the expense of other normal elements used in painting, aiming, largely by the use of intersecting, cubes, cones, and other geometric solids, to produce a specific abstract look rather than a representation of nature.
For this project we are bringing together two types of art forms - Cubism and Photo Montage. Cubism was made famous by Picasso, and David Hockney is a famous contemporary photographer that works with Montage. We will be taking a series of photos around a single subject and reconstructing them in PS. Composition, a clear focal point, context, form and space is what will create successful images.
For this project we are bringing together two types of art forms - Cubism and Photo Montage. Cubism was made famous by Picasso, and David Hockney is a famous contemporary photographer that works with Montage. We will be taking a series of photos around a single subject and reconstructing them in PS. Composition, a clear focal point, context, form and space is what will create successful images.
Goals for Picasso’s Revenge:
Build off of the skills you’ve learned in Photoshop so far.
Understand how context and purpose influence the content and form of your work
Context – the surrounding conditions in your photo
Purpose – reason for making an image (who is your audience?)
Content – meaning or message in your photo
Form – structure and placement of your photos
Process
You will need 25-30 photos so that you have a variety of images to work from. Also, if you plan on doing a more seamless image you will need many images to show an entire scene.
You will want to take close up images if you want to make a more abstract image, but taking detail shots is not mandatory – they will however give you interesting images to work with.
The finished piece will look different for everyone, but the aim is to see that you have an interesting subject matter (center of focus – which is not necessarily in the center of the image), that you have “built” your photos in creative and interesting way, and that there is some influence of Cubism in your finished piece.
Recap:
- I should be able to see photos that show multiple surfaces of an object or space
- The images should be pieced artfully together in a puzzle-type way that is "cubist" in nature
- The photos should show the dimensions of the object and show time and 3D space on a 2D surface
- Should incorporate detail shots and interesting features of a space or object in space
- Practice piece should have 15-20 photos posted on your assignments page (crop any extra black background so it looks nice)
- Final piece should have 30-50 photos and be posted on you Projects page

hybrid animals

|
objectiveFor this assignment, you will be creating a HYBRID animal. Choose which 2 animals you want to combine together, or maybe you want to be really imaginative and combine 3-4 different animals parts.
process
tips and tricks
|

dali daydreams

|
objectiveFor this project you will be working with found images, self-portraits, and your knowledge and understanding of Surrealism to create a surrealism landscape in Photoshop. Your goal in this project is to create a surrealistic image that is dream-like and symbolic in nature that gives the illusion of reality turned upside down. You will learn about a past art movement and relate it to new technologies in a personal and meaningful way.
Objectives
process
| ||||||||||

what is photography?
|
ObjectiveDemonstrating a critical and contextual understanding of photography can be tricky, especially if the subject is relatively new to you. This unit has been designed to encourage you to reflect on what you know already about photography. Hopefully, some of the prompts will encourage you to further develop your understanding of photography through additional pondering and research.
You will be led through some small group discussions and image analysis. As a group, you will be required to creatively document the notes you have made from the activities. You will need to think carefully about your relationship to photography.
Note: Try to make these annotations as visually interesting as possible. (See example to the left - click to enlarge) Process
Assignment:
Imagine you are the curator of a photography exhibition with the title 'What is Photography?' Your images should work together and have a thread or bigger idea that connects them together. Don't make it to obvious - you will need to research and dig deep to find a common thread that exposes the viewer to a side of photography they haven't considered before. You can choose a number of images to represent your understanding of photography. These images can be any type of photography from any time in the history of the medium. They could include commercial and art photography, amateur and professional. You will be required to print and display an exhibition of images to be hung somewhere in the school. You may choose to relate to your theme to your exhibition space in some way. Note: Try to be really creative about how you do this. For example, you could exhibit the images in the library or front case – you would then invite visitors, provide them a guide to the exhibition, produce relevant publicity materials, print a catalogue with accompanying text, create a video interview with the curator ...etc.
| ||


Toy Story - Block G/H
| |||


| Tiny Toys Outline.docx |
objective
You will have five classes to plan, collect toys, shoot, edit and print five Tiny Toy scenes. We will be doing a print run and installation March 16th/17th.
process
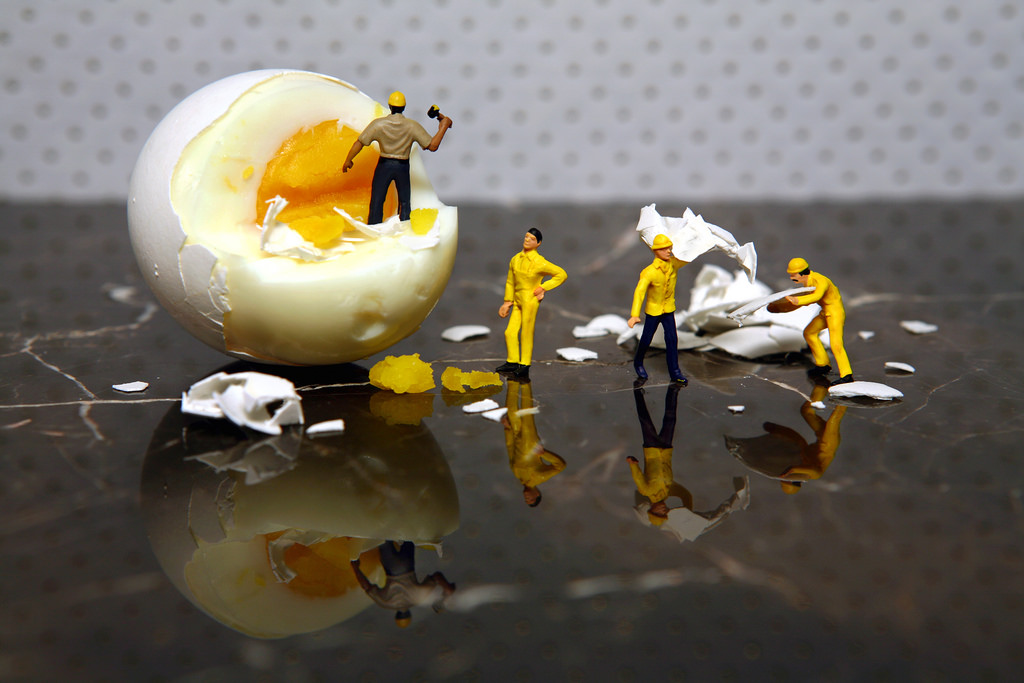
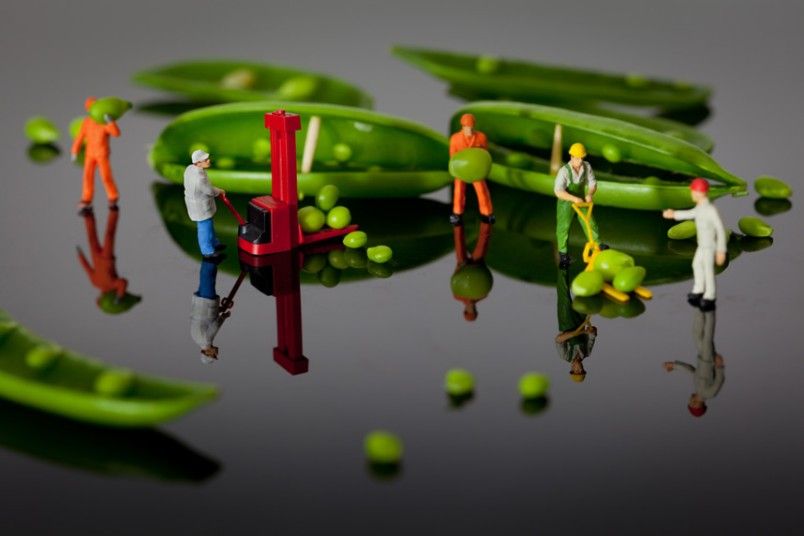
- Tell A Story – Each toy has its own background story. Be they be action figures, dolls, superheroes or giant mecha (robots). Each product line has a rich “origin” to it. Use these elements to either create thematic or wacky themes. An example would be Star Wars toys interacting with everyday objects in your kitchen… or how about small, green army men having a life of their own and invading your work-station when you leave the office. There are endless possibilities.
- Make them more human – Pose and compose your shots as if you were shooting a real human being. You may apply the elements you learned in portraiture to this. You can also combine and experiment with landscape photography and then apply your toys to all of nature’s splendor. You can start in your own backyard using natural sunlight. You can’t get a cheaper or better light source than that.
- Don’t be afraid to experiment – The good thing about toy photography is that; there no set rules on how to do it right. As a photographer, you create your own style. You may want to apply the things you learned about product-photography and use that light box as a studio for your “models”. I love borrowing dolls from my niece and getting a “professional magazine like model” shoot. You can have our pets interact with your toys too. Just fire away, you’re bound to get a few great “keepers”.
- Learn from others – The Internet allows you to check out the works of other hobbyist toy photographers. I follow the Star Wars Toys Flickr group and this Flickr group so that I can see their own works. More often than not, some photos will spark off my own ideas on what I’ll integrate in my next photo-shoot or project. It’s also best to interact with the community and ask questions. They’ll be more than glad to offer help.
- Indoor – If you can take your flash off camera, you’re in the right track. The best areas inside our home are the kitchen, the living room, your home office or even your garage. Just imagine wild and fun scenes that your toys can make and you’ll have hours of fun. You can also use a simple light box to add drama to an otherwise bland and boring toy.
- Outdoor – The outdoors (and natural sunlight) are great for toy photography. You can use your flash to “fill in” when your subject’s back lit. You can also bring a home-made reflector (such as the sun screen of your car) and use that to add more light to your subject. I normally use my “nifty fifty” (Canon 50mm f1.8 II) lens for this. It’s sharp and affordable. Great for this hobby!

photojournalism


|
| ||||||
Photojournalism overview:
Photojournalists acquire a sense of storytelling that includes feeling empathy with their subjects. It’s more than a technical understanding of how to take good photos and being in the right place at the right time, it’s being aware of the impact their story will have.
Good photojournalists prepare and plan their stories/shots. They apply their knowledge and experience to find interesting stories that are true to their subjects.
Photojournalists who want to develop good photo-based stories should consider the following:
Good photojournalists prepare and plan their stories/shots. They apply their knowledge and experience to find interesting stories that are true to their subjects.
Photojournalists who want to develop good photo-based stories should consider the following:
- Central Idea – with any story there should be a central idea that an be stated in one or two sentences. Example: “This story shows what a farrier has to do to shoe a horse” or “This story investigates the growing number of schools building organic gardens and the impact farming practices are having on younger generations.”
- Who – the people involved in a story are usually the most important elements of that story. You as a photojournalist should have a clear idea of who is involved in the story and what it will take to get a good photograph of them.
- Do you have their permission to take their photo?
- What are the relationships between the people of your story? How do you plan to capture these connections?
- Where – the location of the story is the most important consideration for a photojournalist. What are the visual settings? Different angle shots, close up, middle range and wide angles will give a variety of vantage points and tells the story with more accuracy.
- Action and Movement – What type of actions are involved in this story? Getting into position to photograph action shots constitutes good planning and strategy on the part of the photographer.
- Expression and emotion – Is this a happy story, serious, or sad? Does the story contain determinism, contentment or resignation? Is their excitement generated by the story? The approach you take to photographing your subject will give an overall mood to the story.
- Order and Sequence – This is of great importance to photojournalism. Find a flow to the photos that makes sense to your story – chronological is one way, but in any event you should have the sequence established before the photos have been taken.
cindy sherman
| ||||||||

| cindy_sherman.pdf |
| cindy_presentation.pptx |
objective
Objectives: Students will observe the photographic work of Cindy Sherman and become familiar with her style and process. Each student will create three self-portraits one of which conceals your identity, another that plays with stereotypes/gender, and one that resembles Sherman’s “Untitled Film Stills”. The complexity of idea and style will be key in fulfilling the requirements of this project.
Materials and :
Cindy Sherman Video Clips
Online Research
Hand out Sheets on Cindy Sherman and her Process
Students Supplied a Variety of Props/Costumes, etc.
Digital Cameras
Studio Lighting and Props
Photo Paper to Print Out Your Best Image
Class Critique of the Images
Artist Statement and Post Your 3 images to your Website
process
|
|
|
|
tiny planet

|
objectiveComing soon!
process |

avatar adventure

|
objectiveComing soon!
process |
